Install
Download the required resourses
Download Macle Development IDE extension Macle_23.3.0_DevSuite_IDE
Download Macle Simulator
Download and Install Visual studio code Get VSCode
Setting Up the Development Environment
After obtaining the necessary resources, we can set up the development environment by following these steps:
Installing the Macle_23.3.0_DevSuite_IDE
Extract Macle_23.3.0_DevSuite_IDE.
Open Visual Studio Code and go to the options menu. Select "Install from VSIX" and locate the extracted
macle-miniprogram-tools-23.3.0file. Proceed with installing the extension.
Reload the Visual Studio Code window.
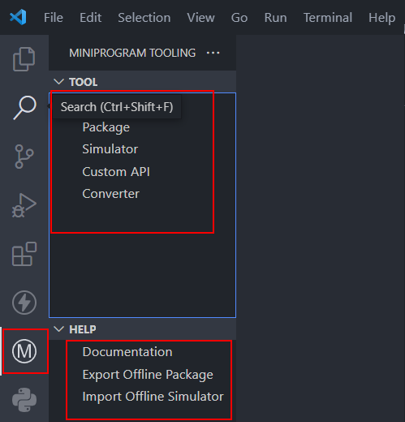
If the installation is successful, you will be able to see the
Mlogo on the sidebar of Visual Studio Code.
Import the offline simulator
- Obtain the simulator suitable for your operating system by downloading it.
- Launch Visual Studio Code and navigate to the Macle extension.
- Access the help tab and choose the option to import the offline simulator.
- Locate the downloaded simulator file and proceed to import the offline simulator
Create Your first Mini app
- Open Visual Studio Code.
- Utilize the Macle extension to initiate a new project with your chosen name.
- Open the project in a new window.
- Click on the simulator to preview the appearance of the mini app.
Congratulations, it's now completed!